I kinda have a thing for pin cushions in general, but especially this one. It’s just happy. Whether it’s hanging up, or displayed on your table, it’s just… well, happy, is still the word that comes to mind.

MATERIALS NEEDED
Small embroidery hoop
Cork cupboard liner
Scrap of fabric
Fiber fill
Hot glue gun

INSTRUCTIONS
Separate the two pieces of the embroidery hoop and lay the inner hoop on the back side of the cork and trace the inside circle twice. Try to angle the pen to get as accurate of a tracing as possible. Cut out both circles.


Lay the inner embroidery hoop (the piece with no fastener) down on top of newspaper or a brown paper bag, and place the cork inside with the sticky side facing the inside of the hoop. Use a hot glue gun to secure the edges of the cork to the embroidery hoop.


Loosen the embroidery hoop fastener, and stuff it with fabric, and a large handful of fiber fill. Put the inner embroidery hoop back in place, with the non-glued/non-sticky side of the cork touching the fiber fill. Pull the fabric tight from the back side, and tighten the embroidery hoop fastener as needed.


Trim the excess fabric, leaving about 1″ around the edges. Fold them down and glue in place.


Remove the paper backing from the other cork circle, and hot glue the sticky side. Place it over the back side to hide the raw edges of the fabric, and hold firmly until the glue sets.


Then just fill it up with your pins,

and add it to your notions wall! Be sure to stop by again tomorrow for the next tutorial.

Ok, I’m mixing up “be inspired” a little bit today.
See, typically I show you three of my own photographs that inspired a project, but today I’m going to show you three pictures of other people’s work that have inspired something… well, something pretty fantastic, if you don’t mind me tooting my own horn here.


When you have a space-consuming passion like sewing, it can be difficult trying to create an efficient work space, especially when you live in a small apartment. I’ve tried keeping my things in containers, and luggage, and boxes. I’ve even tried putting it all into fairly permanent storage to make room for more important things, like the kitchen table (absolute misery). But this time I have a real solution- a way to keep all of my sewing tools out of the way, but still in reach.
The idea hit me when I started seeing pictures of embroidery hoop wall art all over this here internet. I liked it, but that naggy, practical part of me was saying, “but what’s the point?” So I negotiated with myself: you can put up the wall art if you can make it functional- two birds, you know. Then I remembered that obnoxious pile of containers- each too small for it’s contents- taking up my precious closet space.

One of my favorite things about this wall is how simple it is to take each embroidery hoop off the wall to work with at your table while you sew.

I shared my notions wall over at U-Create last month, and now, during this entire upcoming week (Monday-Friday), I’m going to share detailed tutorials on how to make each part. Maybe there’ll be a giveaway too… okay, definitely there’ll be a giveaway! Stay tuned, and be excited…

And a big thanks to Katie, from Bower Power, for her beautiful inspiration!
It’s always a good idea to read through a pattern completely before starting. Sometimes an instruction further into a pattern will help clarify something you didn’t quite understand earlier in the pattern. Reading through the whole thing also helps you work faster once you start sewing because you’re somewhat familiar with the process already.
THE ENVELOPE
Store bought patterns come in an envelope. This will usually have a picture of the finished product from different angles on the front, as well as basic information on the pattern. The back of the envelope provides measurements and sizes, a list of materials needed (including notions and how much fabric to buy), and a more detailed description of the pattern.
If you’re using a PDF pattern it should contain all of the same information at the beginning of the pattern, because there is no “envelope”.
LABELING
Shown below are the pattern pieces for the Fox Scrapped Animal. Every piece is marked with the company name (Yellow Spool), and the Pattern Name (FOX). Each piece is also marked with it’s specific piece name (body, ears, nose, etc.) and cutting instructions (cut 1, 2, 4, etc.).

<
Big pattern companies have a numbering system that is also marked on their patterns and envelopes.
CUTTING
Some patterns (i.e. clothing patterns) will have a scale of various sizes in one pattern piece. Rather than cutting down to the smaller sizes, it’s smart to use tracing paper (I personally like table paper) to trace the smaller sizes so you don’t lose the larger sizes in case you want them later.
The bold, outer line is the line to cut along. Dotted lines usually indicate specific instructions. For instance, the Scrapped Animals have a long rectangular side piece that measures 32″ long. Because that’s much longer than a piece of paper, I’ve put the cutting instructions for that piece inside of a dotted line to indicate that the box itself is not the pattern piece.
Dotted lines are also used within a pattern piece to show placement. The Snail Shell has a hand-stitched spiral that is indicated with a dotted line, and the Duckbill Platypus has a large beak sewn to the center of it’s face, which is also indicated with a dotted line to show placement. Dotted lines are not to be cut out unless indicated in the pattern instructions.
When a piece is perfectly symmetrical, you are sometimes instructed to cut it out on the fold. This saves pattern space, and makes for less cutting. It is marked with an arrow-bar pointing to the side of the pattern that should be lined up at the fold.

Commercial patterns usually have diagrams showing the best cutting layout for you. That diagram will be marked with the selvage, folds, and direction of grain.
MARKINGS
Notches are little triangular markings on some pattern pieces showing where to line certain pieces up together. If there is more than one place on a pattern that needs notches, you get double notches, triple notches, and so on.
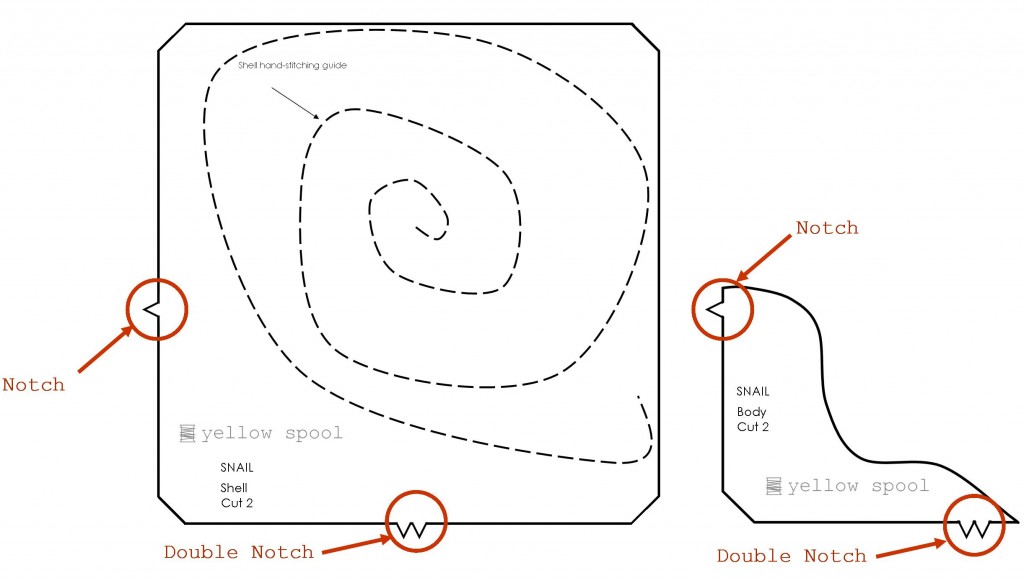
The notches on the Snail Scrapped Animal pattern show where to line the body with the shell.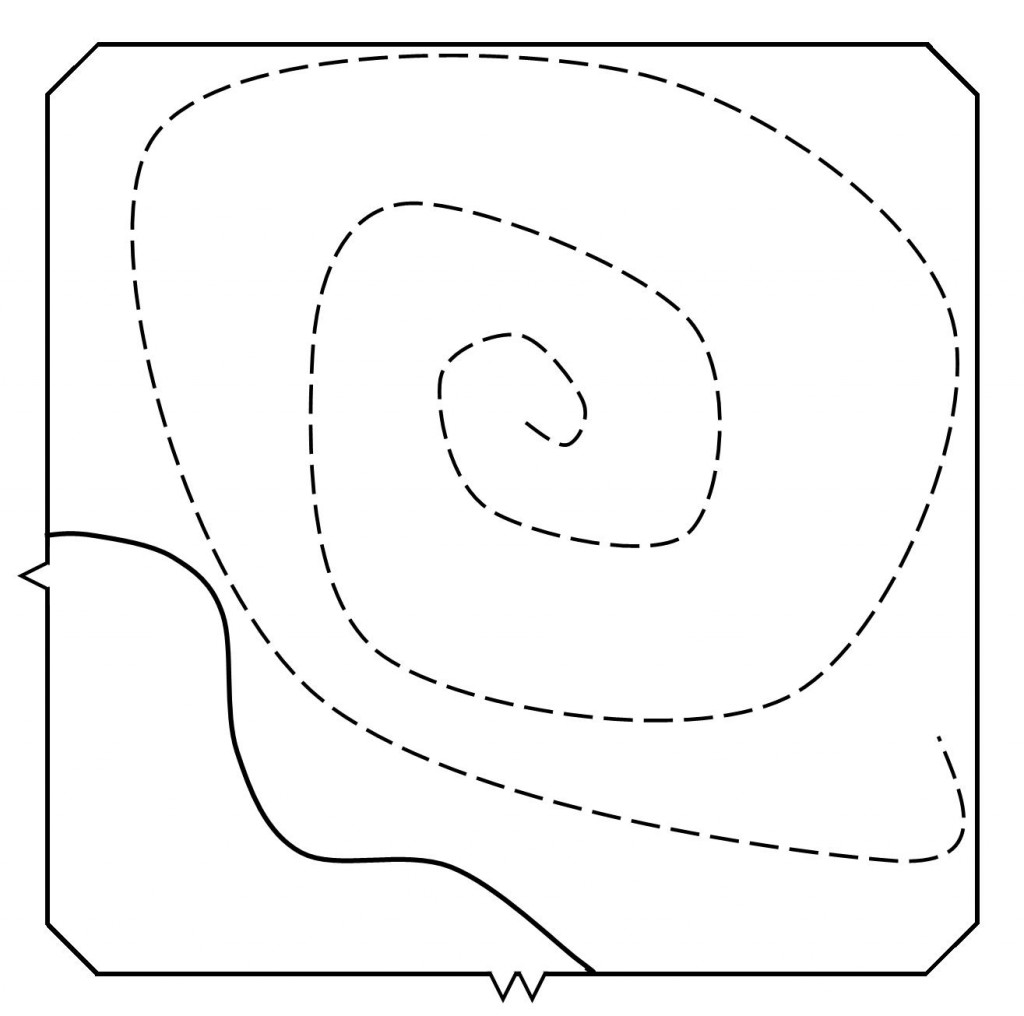
If a pattern has other marking it should have a key explaining what they mean.
PATTERN INSTRUCTIONS
Patterns are written in step-by-step instructions. In addition to written instruction, images are provided to help you visualize as you go. Large, commercial pattern companies show their steps with drawn images, while most small, online pattern companies choose to show their pattern instructions with photographs.
COMMON TERMINOLOGY
Right side of the fabric- The right side of the fabric is the side that you want seen when the project is finished. Sometimes the colors are more bold on the right side of the fabric. Patterns will tell you to line pieces up with the “RIGHT SIDES TOGETHER” or with “RIGHT SIDE UP”.

Wrong side of the fabric- The wrong side of the fabric is the side that you want to hide when the project is finished. Sometimes the colors are dull on the back side of the fabric. Patterns will tell you to line pieces up with the “WRONG SIDES TOGETHER” or with “WRONG SIDE UP”.

Seam allowance– Some patterns show a dotted line for the seam allowance, others simply give you instructions for the seam allowance. If a pattern is sewn with a 5/8″ seam allowance you should line the edge of the fabric at the 5/8″ guide on your needle plate as you sew. It leaves a 5/8″ (or whatever seam allowance you use) space between the stitching and the edge of the fabric.

HOMEWORK

This sample book is only an optional part of the sewing e-courses, but it is completely worth it. It allows you to practice each technique before you attempt it on an actual sewing project. With the PDF printables available for each course, your book will be a place to turn to, to see a physical sample of a technique as well as a simple description for future reference.


Introduction to Sewing Sample Book Printout
Intermediate Sewing Techniques Sample Book Printout
MATERIALS NEEDED
1 yd. woven fabric (solid color) for each e-course
Contrasting thread
Any notions indicated in the specific lessons (buttons, zippers, etc.)
INSTRUCTIONS
1. With the fabric pre-washed and ironed, cut 12 squares and rectangles according to the instructions in the sample book PDF.
3. For each sample, cut a small slit right above the template in the sample book, and slide a paperclip in place. This paperclip is how you’re going to attach each sample to the sample page.


4. There are simple instructions on each page, as well as space for your own notes.

4. Hold all of your samples together in a binder to keep them organized and accessible.

PDF PRINTOUTS
Introduction to Sewing Sample Book Printout
Intermediate Sewing Techniques Sample Book Printout